Why Stock Inseams Collide With Your Footwear Rotation
At 8 a.m., a tilted bedroom mirror makes the problem obvious. Vintage wool-blend pleated trousers swallow the upper of a low-profile skate shoe. Swap in a lug-soled derby and the same hem catches on its heel tab. The waistband stays put; the bottom of the silhouette changes completely.
One inseam, two collisions.
Before reaching for scissors, compare both shoes at the same waistband position. Look separately at the front pooling and the rear snag. Shortening enough to clear the derby’s heel tab might leave the skate shoe looking stranded beneath a high cuff.
Stock lengths such as 32 and 34 inches offer a starting point, not a fitting decision. Some trousers arrive with genuinely unfinished bottoms. Others have perfectly serviceable factory hems that land badly on a particular wearer and shoe. Check which kind sits on the bench before unpicking anything.
The cuff-to-shoe relationship sets the silhouette. Treat inseam length as a choice made with footwear on.
That relationship matters as much to the outfit as the shoulders of a Mitchell & Ness jersey or the width of a wool flannel overshirt. A strong upper half cannot rescue fabric piled over the laces. Pick the shoe that will anchor this pair of trousers, then fit the hem around its actual shape.
Read the Break Against the Vamp and Collar
A trouser opening measuring 7 inches flat has approximately 14 inches of circumference. A 9.5-inch opening has approximately 19 inches. That difference changes how far the leg can descend around the upper, even when both trousers share an inseam.
The narrow opening tends to stop higher against a broad or steep vamp. The wider opening can fall around more of the shoe. Check the rising upper, collar and projecting heel tab before blaming the sole: a thicker outsole raises the shoe and wearer together.
Four Breaks, Four Different Falls
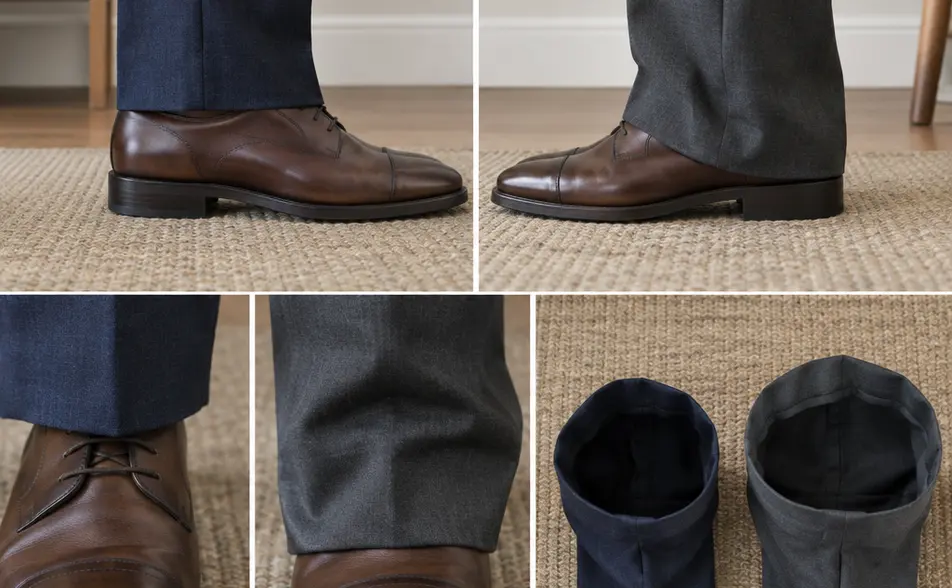
- No break: the front falls cleanly without a fold caused by shoe contact.
- Quarter break: the front line meets the shoe with a slight interruption.
- Half break: a distinct fold develops across the front.
- Full break: a deeper fold leaves more cloth resting on the upper.
These describe the standing silhouette. Walking lifts and releases the cloth; sitting pulls it upward. Watch whether the hem settles again or remains hooked behind the collar. A clean mirror pose tells only part of the story.
Keep to Wovens
This method covers woven cotton twills, tropical wools and mid-weight flannels. Heavy raw denim at 14 ounces per square yard and above falls outside this walkthrough: hand sewing can secure it, but cannot reproduce a machine chain-stitched finish. Technical waterproof shells need compatible seam tape and controlled application to restore sealed seams.
For a rotation spanning low skate shoes and bulky derbies, which pairing deserves the cleanest fall?
Prepare the Cloth Before Threading the Needle
Establish the fabric’s condition before establishing its length. Wash washable chinos as they will be washed in use. Follow the care instructions for wool, using appropriate steaming or professional care. Let everything dry and cool before measuring.
Pre-treatment reduces the risk of a newly finished hem changing length immediately afterward. Steaming alone cannot guarantee protection against shrinkage during later laundering.
Lay Out the Sewing and Pressing Tools
- Size 7 or 8 sharps hand-sewing needles.
- Fine cotton-wrapped polyester-core thread, or suitable thread lightly dressed with beeswax to reduce tangling.
- Glass-head pins, tailor’s chalk and a flexible 60-inch tape.
- Seam ripper and fabric scissors.
- Steam iron, press cloth and wooden clapper.
A clean, heavy book can hold a protected fold flat after pressing; keep it away from direct steam. Remove the old hem stitches and press out the previous fold so the original crease does not dictate the new length.
Leave fusible hem tape out of this alteration. Its bonded strip can stiffen the bottom edge, and adhesive durability depends on the product and care conditions. Sewing keeps the fold adjustable when the footwear rotation changes.
Pin the Hem While Wearing the Target Shoes
Put on the chosen shoes and secure the waistband where it actually sits, using the intended belt or adjusters. An unsecured waistband can slip during fitting and corrupt every mark below it.
- Turn an initial hem inward. Pin it provisionally, keeping the trouser leg relaxed.
- Check the back. Stand naturally and inspect the bottom edge against the heel, collar and any projecting tab.
- Check the front. Find the point where the crease contacts the vamp and judge the resulting fold.
- Adjust, then stand again. Squatting gives access to the pins; judge length only after returning upright.
- Fit both legs independently. Compare their fall rather than transferring one measurement unquestioningly.
Mark the proposed finished-bottom line in chalk. Keep enough cloth inside for a finished hem depth of 1.5 to 2 inches. That internal weight helps the edge settle, although stiffness, opening width and shoe contact also govern its movement.
Reserve the Turn-Under
A 1.75-inch finished internal hem needs 2.25 inches below the finished-bottom line when an unfinished edge requires a 0.5-inch turn-under. The internal hem depth and cutting allowance are different measurements.
Keep surplus cloth until the movement test passes. Once the length is settled, turn an unfinished raw edge under by 0.5 inch, fold the main allowance inward and place pins perpendicular to the bottom fold. An existing suitable serged edge can remain without that extra turn-under.
Press through a cloth at a fabric-appropriate temperature. Lift the iron rather than dragging it along the leg. Hold the fold with the clapper while it cools; the crease should survive the move from ironing board to sewing position.
Baste, Walk, Then Sew the Blind Catch Stitch
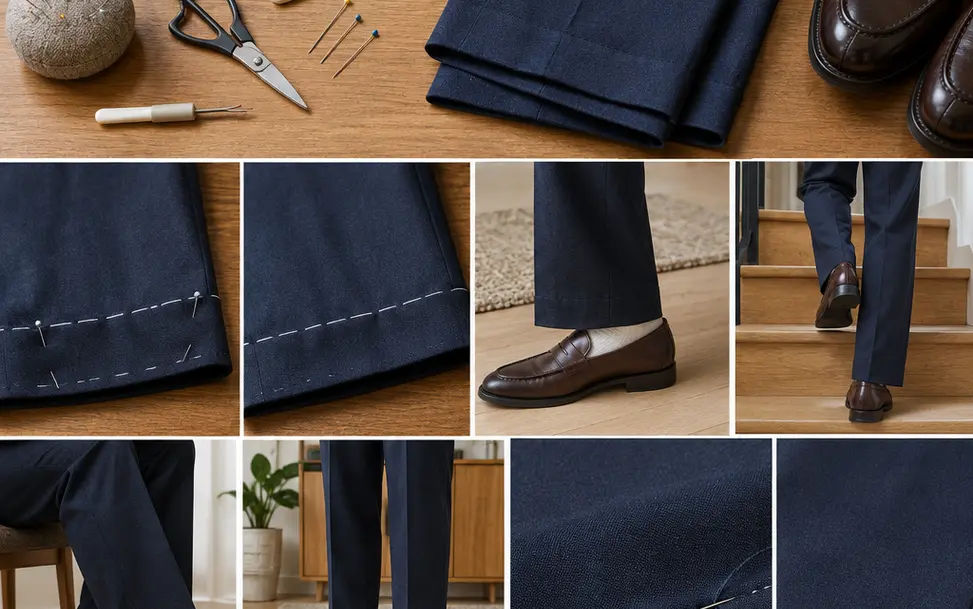
Temporary basting earns its place before permanent stitching. Baste the proposed hem, remove the pins and put the trousers back on with the target shoes. Walk normally, climb a flight of stairs, then sit and stand. Check sock exposure and whether the hem drops back without a tug.
Adjust now, before trimming surplus cloth or committing to the finished stitch.
Keep the Outer Pickups Small
Turn the trousers inside out and roll back the upper edge of the internal hem enough to hide the stitch path beneath it. For a right-handed sewer, progress from left to right, taking small bites back toward the preceding stitch.
- Secure the thread within the hem allowance.
- Pick up one or two yarns from the trouser body, avoiding a conspicuous stitch through the outer face.
- Take an approximately 0.25-inch bite along the inner hem fold. The connecting thread crosses diagonally between pickups.
- Repeat with relaxed crossed threads, forming tiny figure-eight suspension bridges between the layers.
Open the fold periodically and examine the outside in strong daylight. Dimples mean the thread is pulling too tightly or the body pickup is too large. Ease the tension before continuing.
Secure the finishing stitches inside the allowance, then repeat the walk-and-sit check. The cloth should move without the sewn edge drawing into a tight ring.
Fit a 9-Inch Chino Opening Over a Lug-Soled Derby
Use this fitting specification for vintage military-style cotton chinos measuring 9 inches flat at the opening. The target is a clean quarter break over the actual lug-soled leather derby being worn.
- Prepare and dress. Wash and dry the chinos according to their care instructions, release the old hem and press out its crease. Put on the derbies and secure the waistband at its wearing height.
- Set the rear clearance. Pin the proposed bottom edge 0.25 inch above the top of the rubber welt or projecting sole ledge. Stand naturally before confirming the mark.
- Set the front contact. Aim the front crease near the third eyelet, counting upward from the toe end. Use that as this shoe’s visual reference. The cloth should show one slight interruption, without collapsing into two stacked folds.
- Baste and move. Check both legs while walking, climbing stairs and sitting. Adjust the marks until the hems return cleanly.
- Measure the allowance. Retain 2.25 inches below the confirmed bottom line: 1.75 inches for the finished internal hem and 0.5 inch for the raw-edge turn-under. Trim only after the basted fit passes.
- Fold, press and sew. Turn under the raw edge, form the internal hem and press through a cloth. Work the blind catch stitch with successive trouser-body pickups approximately 0.5 inch apart, keeping the crossed thread slack.
- Finish the twill. Press the internal hem through a lightly dampened cotton tea towel, settling the stitches without imprinting the allowance ridge on the outside. Let the cloth cool and dry, then hang the chinos by their cuffs overnight. Put them on with the same derbies and check the rear clearance and single front interruption again.